
There are many ways you can improve your photography. One of the main aspects is to improve the sharpness of your images that you capture. If we look at all the issues and there are many which can contribute to movement of the image captured by the camera sensor; it is the camera sensor which actually records the image and we can appreciate that this can turn into a very complex problem in getting the ultimate sharp image. In the past I have always been very astute at trying to achieve the sharpest images possible. In this blog I will try to summarise all of the issues involved in this subject. There are essentially two types of movement when taking images, the first being when the subject moves and the camera is stable, the second being when the subject is not moving but the camera may move to blur the image or in many cases there may be a combination of both these types of movement.
Camera Settings
Understanding your camera settings is so important in achieving sharp images. Previously I have documented A Detailed Guide To Understanding The Settings And Menus On Your Digital Camera and this is so important to get the best out of your camera equipment. There are many settings in the camera which can have an effect on the image sharpness, with a few of the important ones sumarised as follows.
Shutter Speed
The shutter speed is critical as you would expect to get sharp images. A slow shutter speed will result in a non sharp image if the subject being photographed is moving, however a high shutter speed will enable you to freeze any action if the subject is moving.
Aperture
In addition to the shutter speed, the Lens Aperture can also have an impact on image sharpness. A large aperture lens setting of f/1.2 or f/1.4 will have a very narrow depth of field, meaning that only a very narrow section of the image will appear to be sharp with the area closer than the focused distance and the area further from the focused distance being out of focus and will not look sharp.
ISO
I have previously blogged about Taking Advantage Of Your Cameras ISO Settings With Nikon Cameras and the ISO setting on the camera can have a significant effect on the sharpness of the final image.
In general with cameras, the higher we go in ISO speed settings the more noise is introduced into the images. The effect of noise on the image is such that it adds a grain like texture to the image and this can effectively make the image look less sharp. It is very safe to say that an image captured at an ISO setting of ISO100 will look sharper than an image captured at ISO6,400. The reason for a range of ISO settings in a camera is to give more flexibility for the camera to cover a range of lighting conditions, from complete darkness, to extremely bright conditions with full sunlight. The fundamental issue is to use the lowest ISO setting that you can, under the existing lighting conditions.
Equipment
The Camera
In all cameras when an image is captured, there is some mechanical movement in the camera and it is not generally recognised that this movement can cause some movement or vibrations in the camera itself, any movement like this may cause your images to be less sharp.
Digital SLR (DSLR) Cameras
All digital SLR cameras will have a mirror and shutter. When the shutter button is pressed, the mirror flips up and then the shutter moves across to expose the image. All this movement has the possibility to cause small vibrations in the camera which may affect the final image sharpness.
Mirrorless Cameras
With the mirrorless cameras, guess what, they do not have a mirror similar to the DSLR, but they still have a shutter which moves across to expose the image. On this basis a mirrorless camera may have a tendency to have less vibrations compared to a DSLR camera.
It also should be noted that some mirrorless cameras have in camera stabilisation, where the image sensor moves to help compensate for any vibrations or movement in the camera.
The Lens
The lens attached to the camera can have an impact. An image from the lens set at the widest aperture compared to the narrowest aperture will impact on the sharpness of the image due to the depth of field variation. Also a super telephoto lens will be more subject to camera movement than a wide angle lens. This is the reason why many longer lenses have built in vibration reduction or image stabilisation, to help eliminate any camera/lens movement.
In addition to any lens movement causing lack of sharpness in images, the quality of the lens can have an impact on the sharpness of the image. There is a good reason why similar lenses can vary greatly in price and the reason is that in general, the quality and sharpness of the more expensive lens will be much better.
It should also be noted that the sharpness of a lens can improve if it is stopped down by one or two stops from the widest aperture.
Support Equipment
I see support equipment as being one of the most important things in achieving sharp images.
Tripod
Tripods can be an excellent addition to your equipment to give sharper images, by stabilising the camera. The stability of tripods can be measured by their stiffness and the stiffer a tripod is the more stable it is. In general you can note the following in respect to the stiffness of tripods:
- Raising the center column will reduce the stiffness,
- Raising the height of the tripod will reduce the stiffness
- Compact tripods with multiple extendable leg sections will be less stiff,.
- Heavier tripods will be stiffer.
If you are using light weight travel type tripods which fold up small, they will not perform as well as heavier tripods, also with light weight tripods, beware of the effect of wind, the last thing you want is your expensive camera equipment biting the dust.
With my photography, I prefer a reasonably heavy tripod with a relatively heavy head to mount the camera. The head for my tripod is either the ball head or Gimbal.
Monopod
Monopods can be a replacement for a tripod when you need mobility. I prefer to use a monopod when I need to be mobile and use lenses 200mm or longer. The head for my monopod is either the tilt head or the gimbal head.
Ball Head
I find a good ball head is fine to use on a tripod and can pan and tilt as required.
Geared Head
Geared heads can be used where you need to make incremental adjustment to the panning and tilting of the head.
Tilt Head
A monopod can naturally pan without a head, so a panning head is not required. The tilt head is very useful in this situation to use on a monopod.
Gimbal Head
I find a gimbal head very nice to use with my 200-500mm telephoto lens and also sometimes with the 200mm lens. I use the gimbal on both the tripod and monopod.
Electronic Flash
The electronic flash unit is an unsung hero in helping to get sharper images. Many people do not realise that the electronic flash units do offer an extremely short flash duration. As an example my current flash unit is a Nikon SB5000 and the specification for the flash duration for this flash is as follows:
- 1/980 sec at M1/1 (full) output,
- 1/1,110 sec at M1/2 output,
- 1/2,580 sec at M1/4 output,
- 1/5,160 sec at M1/8 output,
- 1/8,890 sec at M1/16 output,
- 1/13,470 sec at M1/32 output,
- 1/18,820 sec at M1/64 output,
- 1/24,250 sec at 1/128 output,
- 1/30,820 sec at 1/256 output.
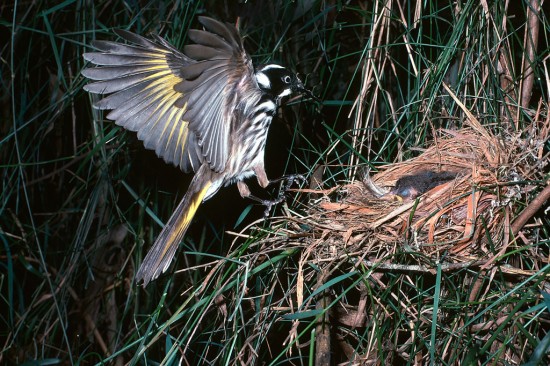
I think it is crazy that the flash can fire at such high speeds. You may not think this is practical to use a flash at these high speeds, but for close up and macro photography work this is totally practical and will help to stop any movement of both the subject and camera and give sharper images. As an example below the Yellow winged honey-eater has been captured with high speed flash and the camera set up remotely and controlled by remote control as the bird flew through a light beam.
Focus Stacking
I have previously blogged about focus stacking with the Nikon 200mm micro lens and this can be an excellent method to get an extremely wide depth of field and to achieve what appears to be a much sharper macro (micro) image.
A good example of focus stacking is shown here.
Post Processing
Even taking into account all the above issues and tips there is still a possibility of improving the sharpness of your images after you have taken the image. There is the ability to post process your image files and with lots of post processing software available, there is the possibility of increasing the sharpness of your images once you have the image file in your possession. I have blogged previously with a tutorial on the new Nikon NX Studio Software and this software has the functionality to improve the apparent sharpness of the image. With this NX Studion software there are the following settings in the sharpness adjustments:
- Original Value,
- Sharpness,
- Unsharp Mask,
- Intensity,
- Radius,
- Threshold.
Summary
The route to the sharpest image possible can be a complex issue but if you are careful with your photography and consider many if the issues at hand, you have the possibility to greatly improve your photography.
Some of the Equipment I use.