The new Nikon NX Studio software has a very useful addition to the still image processing and that is processing and editing video/movie files. I have recently reviewed the still image processing part of this software and will now review the video image editing functionality.
Thumbnails
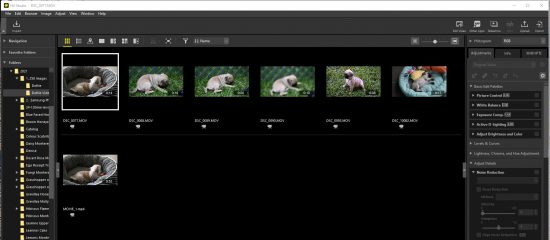
Once your video captures have been added to your computer they can be viewed in the thumbnail section of the NX Studio. The view will be as shown below:
Trim Movie
The original short movie clips can be trimmed to suit.
- Click on the thumbnail to bring up the full video image view,
- Hover over the bottom of the full screen to see the Film Clip Control.
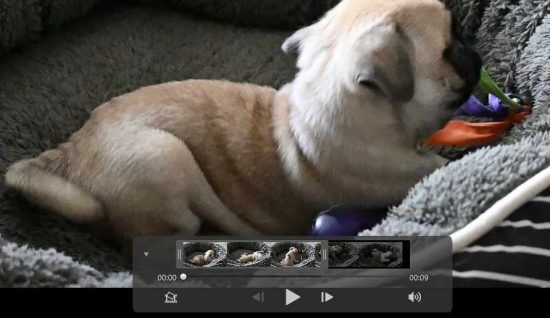
- In this film strip control box, if you click on the arrow in the upper left of the box, the film strip will appear or disappear as required.
- The two cursors at each end of the film strip can be set to determine the start and end of each film strip clip.
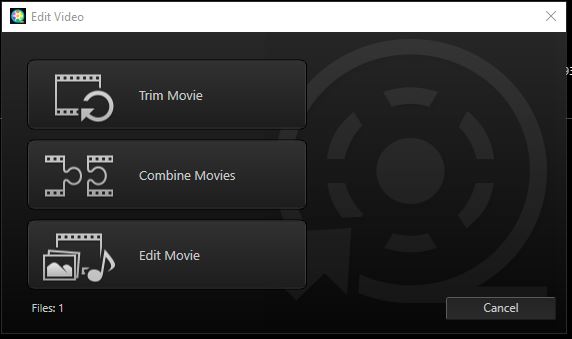
- After selecting a movie clip from the thumb nails and setting the start and end of the clip, click on the “Edit Video” button, the following dialogue box will pop up;
- Select the “Trim Movie” button. Then the “Output Movie” dialogue box will come up to give the settings for trimming the movie.
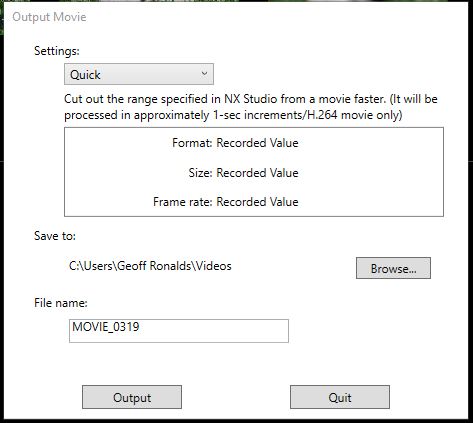
There are two settings
- Quick – Gives basic video settings,
- Advanced – Gives advanced video settings to select different formats, sizes and frame rates for the video,
- Select the Save To,
- Select the File Name,
- Click on “Output” and the movie clip will be trimmed and saved.
Combine Movies
Once all clips have been trimmed and you are happy with them, go back to the thumbnails and select the movies you want combined.
- Select the thumbs of movies you want combined,
- Select the “Edit Video” button,
- Select the “Combine Movies” button and complete the settings in the dialogue box,
- Select “Output”.
- The saved movie will be the combined movie.
Edit Movie
If you want to Edit the complete movie;
- Select the top “Edit Video” button,
- Select “Edit Movie” and the following dialogue box will appear:
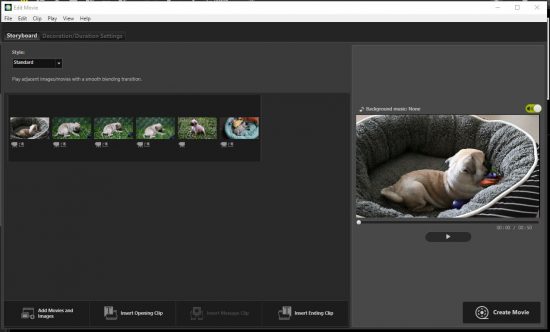
The “Edit Movie” section is quite interesting and has the following Menus;
- File,
- Load Saved Settings,
- Add Movies and Images,
- Create Movie,
- Exit.
- Edit,
- Copy,
- Paste,
- Delete.
- Clip,
- Insert Opening Clip,
- Insert Message Clip,
- Insert Ending Clip,
- Set Volume of Movies to Zero,
- Sort Movies and Images by Date Shot.
- Play,
- Play,
- Stop.
- View,
- Storyboard,
- Decoration/Duration Settings.
- Help,
- Movie Editor Help.
Storyboard
The Storyboard has the following settings for the film strip;
- Style,
- Standard,
- Fade in/Fade Out,
- Wipe,
- Random.
- Add Movies and Images.
- Insert Opening Clip.
- Insert Message Clip.
- Insert Ending Clip.
Decoration/Duration Settings
- Selection to Add Background Music.
- Effect,
- Give Motion Effect to Still Images.
- Duration,
- Normal Playback.
- Still image Duration,
- Short,
- Standard,
- Long.
- Summarize to Fit to Music.
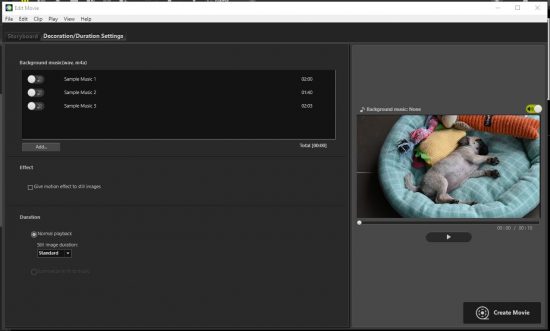
Click “Create Movie” to finally complete the making of the movie.
Summary
In summary this software appears to do everything that I would ever want to do to make up movies. It can do all of the following;
- Edit your short clips.
- Combine your short clips into a movie.
- Fully edit movies.
- Include still clips at start and end of movies.
- Change duration of still images.
- Insert message clips into your movies.
- Can add different styles of fade in fade out.
- Insert background music.
- Change background sound.
A Sample Video Edited With Nikon NX Studio Software
The video “Dottie the Pug”, below, has been edited using the Nikon NX Studio software and most of the available adjustments available in the software have been used for editing this video.
The adjustments used are as follows;
- Each individual movie clip has been trimmed.
- Multiple movie clips have been combined together.
- The edit movie function has been included with the following adjustments included,
- A text title still frame has been included,
- Additional still images have been included,
- Existing sound has been deleted and new sound music has been added,
- Random fade-in fade-outs included,
- The sequence of the images has been rearranged,
- Motion effects added to the still images,
- The still image duration has been changed.
It may be of interest that the video captured for this video edit has been taken with the Nikon Z50 digital camera. The camera performed admirably for this particular job.
I believe I can really find this software very useful as a video editor and remember that it is FREE, if you are a Nikon user. I do not know of many other good video editors that are free.
2 comments
Comments are closed.