
The Niklon ViewNX-i software is free software from Nikon as a basic file management system and basic processing software. The software is quite basic in some respects but I do find it very useful.
This Blog is a little weird as a few days after I published it I found that Nikon had released their NX Studio software and as NX Studio is installed it deletes ViewNX, so I believe that means the end of ViewNx and the new start for NX Studio.
I will do a Blog on the new Nikon NX Studio in a few day once I inderstand the general working of it.
I have reviewed this Nikon ViewNX-i software previously several years ago, but there have been several changes and enhancements, so I have done another review here. There is some repetition in some of the descriptions below, but that is the way the software is set out and designed in the menus, in many cases there are several ways of achieving the same ends.
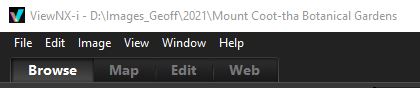
In Nikon ViewNX-i the Main Screen is as follows after importing the images:

Browse
In selecting the Browse option the following screens will be seen
Each of the above screen selection options; File, Edit, Image, View, Window and Help are shown below in detail:
The options on the File Screen are as follows:
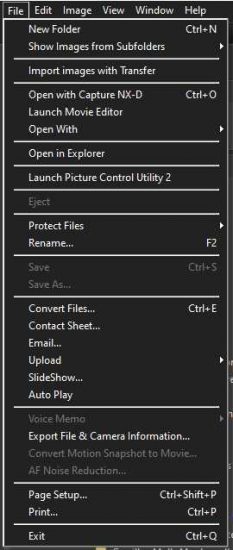
- New Folder – Opens a new folder and lets you name it.
- Show Images from Subfolders – Lets you show or hide images from the current Subfolders.
- Import images with Transfer – Uses Nikon Transfer software to select and transfer images.
- Open with Capture NX-D software – Exports the image to Nikon Capture NX-D.
- Launch Movie Editor – Opens Nikon ViewNX-Movie Editor to edit movies.
- Open with – Opens the image with previously selected software processing packages.
- Open in Explorer – Opens the image in Explorer.
- Launch Picture Control Utility – Launches the Utility to Edit images.
- Eject – Ejects the media.
- Protect Files – Protect/Unprotect the image files.
- Rename – Changes image file name.
- Save – Saves the image File.
- Save As – Save with changed file name.
- Convert Files – Converts files to JPEG or TIFF with different size options.
- Contact Sheet – Select different contact sheet options and configurations.
- Email – Send images by Email.
- Upload – Upload images to social media.
- Slide Show – Select a slide show configuration.
- Auto Play – Autoplay the selected images on the computer.
- Voice Memo – Plays the voice memo.
- Export File and Camera Information – Exports information as text files.
- Convert Motion Snapshots to Movie – Converts multiple images to Movies.
- AF Noise Reduction – Reduces noise recorded in movies.
- Page Setup – Sets up printer page.
- Print – Prints image.
- Exit – Exits Nikon ViewNX-i.
Options on the Edit screen are as follows:
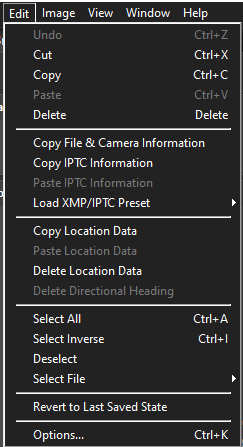
- Undo.
- Cut.
- Copy.
- Paste.
- Delete.
- Copy File & Camera Information – Copies information to the Clipboard.
- Copy IPTC Information to Clipboard.
- Pastes IPTC Information to Image File.
- Load XMP/IPTC Preset.
- Copy Location Data.
- Past Location Data.
- Delete Location Data.
- Delete Directional Heading.
- Select All.
- Select Inverse.
- Deselect.
- Select File.
- Revert to Last Saved State.
- Options.
Options on the Image Screen are as follows:
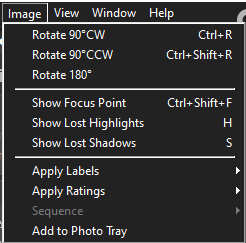
Nikon ViewNX-i – Image
- Rotate 90 degrees Clockwise.
- Rotate 90 degrees Counterclockwise.
- Rotate 180 degrees.
- Show Focus Point.
- Show Lost Highlights.
- Show Lost Shadows.
- Apply Labels.
- Apply Ratings.
- Sequence. – In ViewNX-i, multiple image files in a sequence can be displayed together as a single file.
- Add to Photo Tray.
The Options on the View Screen are as follows:
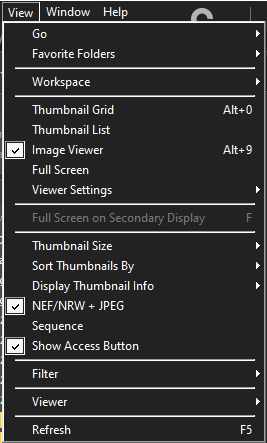
- Go – Back, Forward, Up One Level.
- Favorite Folders – Recent Transfer, Primary Destination, Backup Destination, Backup, Pictures, Video.
- Workspace – Browse, Map, Edit Web Service.
- Thumbnail Grid.
- Thumbnail List.
- Image Viewer.
- Full Screen.
- Viewer Settings.
- Full Screen on Secondary Display.
- Thumbnail Size.
- Sort Thumbnails by Name, Date Shot, Date Modified, File Size, File Type, Label, Rating, ISO Sensitivity, Exposure Time, Focal Length, Ascending, Decending.
- Display Thumbnail Info – File Name/Ratings, Status Icons.
- NEF/NRW +JPEG Sequence.
- Show Access Button.
- Filter.
- Viewer – Fit to Screen, Full screen or percentage.
- Refresh.
The options available on the Window screen are as follows:
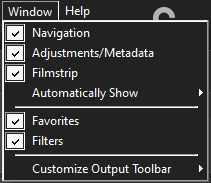
- Selection/Deselection of Navigation, Adjustments/Metadata, Filmstrip, Automatically Show Navigation, Adjustments/ Metadata.
- Selection/Deselection of Favourites, Filters, Customize Output Toolbar with Icon and Text, Icon Only, Text Only, Use Small Size and Customize for Desired Output.
The options on the Help screen are fairly obvious and as follows:
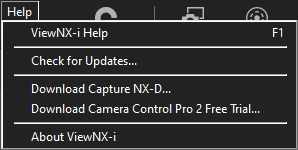
- ViewNX-i Help.
- Check For Updates.
- Download Capture NX-D.
- Download Camera Control Pro 2 Free Trial.
- About ViewNX-i.
Browse View Area – Browse your computer files to view the images

Folders Screen
-
- Select the folder before the current Folder.
- Select the folder after the current Folder.
- Show the folder that is one level higher than the current folder.
- Display the list of your favorite folders.
- Recent Transfer,
- Primary Destination,
- Backup Destination,
- Desktop,
- Pictures,
- Videos.
View Area Mode

- Switches the View Mode
- Thumbnail Grid,
- Thumbnail List,
- Image Viewer,
- Full Screen,
- Viewer Settings,
- Displays Filmstrip Vertically,
- Displays Filmstrip Horizontally,
- Close Filmstrip,
- Compare Two Images,
- Show Focus Point.
- Rotate Image Counterclockwise 90 degrees.
- Rotate Image Clockwise 90 degrees.
- Displays Multiple Image Files in a Sequence as a Single file.
- Select Sort Order,
- Alphabetically by Name,
- Date Shot,
- Date Modified,
- File Size,
- File Type,
- Label,
- Rating,
- ISO Sensitivity,
- Exposure Time,
- Focal Length,
- Asceding Order,
- Decending Order.
- Filter,
- Filter Images BY Label,
- Filter Images by Rating,
- All – Shows Images by selecting the desired file types,
- Search – Displays images that contain specified key words,
- Clear – Ends Filtering and View All Image.
- Waste Bin.
Image View Area is as follows:

- Information on Image Shown or Hidden.
- Show or Hide Histogram.
- Resize Images.
- Resize Slider.
Map
In ViewNX-i select the “Map” section to utilise all the mapping/GPS functionality.
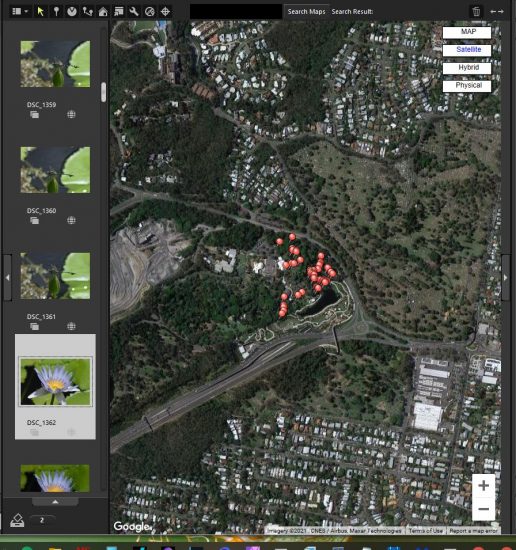
The Mapping icons are as follows:
If you need to add GPS information to your image files follow the steps below:
- In ViewNX-i select all the images that you want the GPS location inserted into.
- ViewNX-i will use a side car file to store the metadata information (including the GPS location information), it does not put the metadata information into the image file.
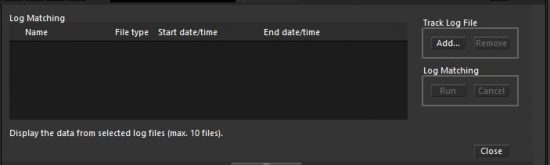
- In ViewNX-i after selecting the “Map” section, then select the icon “Displays the travel route on the map”. A log matching field will open, enabling you to “Add” a “Track Log File” ( this is a .gpx file from the mobile phone or other tracking device) , then click the “Log Matching” “Run” button.
-
- After the above actions, all the image locations for each image file will be indicated on the map.
- It should be noted that if the GPS data is required to be inserted into the actual image file then the images need to be exported to the Capture NX-D software.
File and Camera Information settings can be seen on the right side of the main screen.
Edit
This is the section where minor editing of the image can take place.
The following editing can be carried out:
- Adjustments,
- Exposure Compensation,
- White Balance – Fine adjustment and Tint,
- Picture control information,
- Sharpness,
- File and Camera Information,
- XMP/IPTC Information,
- Histogram.
Web
Various web services can be set up in this section to connect to social media sites as required.
Summary
To sumarise, I find that I do use Nikon ViewNX-i on a very regular basis. and the points below define my usage pattern.
- I find it an excellent tool to peruse my image files after downloading them from the camera.
- ViewNX-i can be very useful if you need to sort your images in any way. I use it regularly to sort images from multiple folders and sort them into focal length etc.
- I use ViewNX-i to import the GPS file information (.gpx files) into the associated side files and then use Capture NX-D to insert the GPS data into the actual image file.