Nikon have introduced some new image processing software, Nikon Capture NX-D, Beta version for comment, prior to the final introduction of the software. This software seems to be a combination of some functionality from Nikon View NX and Nikon Capture NX2 with some functionality deleted. The software no longer has the capability of the NIK software Control Point functions, this lack of the U-point technology from NIK is one aspect I would really miss.

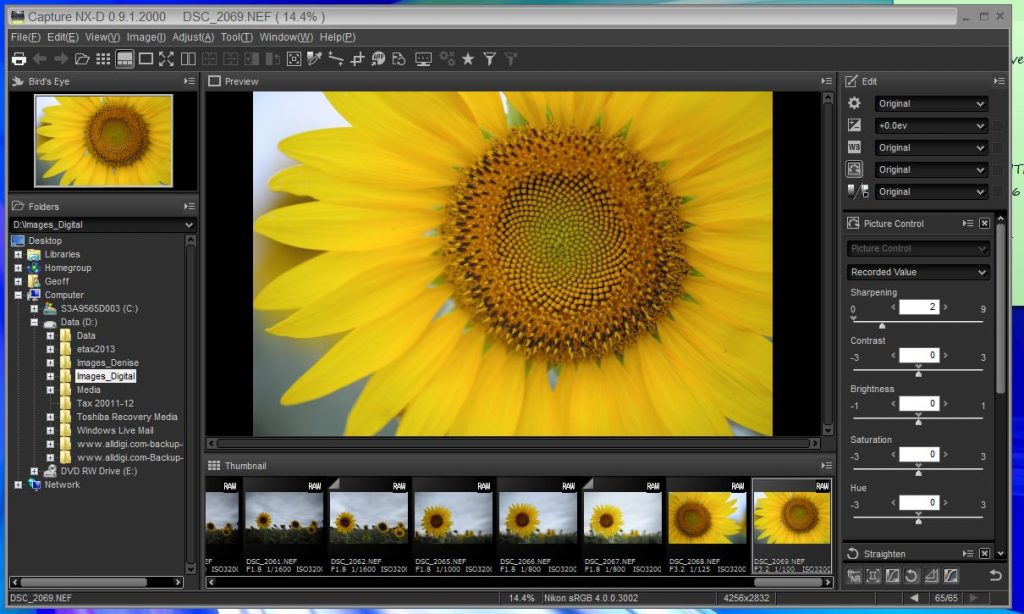
Above is the general screen layout indicating the various menu options and main screen. As I have just started trying out this software I will give a general outline of the functionality and some opinions on how it performs.

The Menu is at the top in the above screen capture with the Tool Bar just below. The general function available are as follows:
Menu Bar
Options available.
- File – Convert files to other formats, run batch processes, and print and rename files
- Edit – Select, copy, paste, and delete images
- View – Choose a view mode, adjust zoom, and sort and select images
- Image – Straighten, rate, and label images or display a grid or the focus point, shadows, or highlights
- Adjust – Copy, paste, save, and load image adjustment settings
- Tool – Access image adjustment tools
- Window – View and hide palettes
- Help – View online help or the current software version number.
Toolbar
- Print – Print the image currently selected or previewed in the image area
- Back/Foward – Select the folder before or after the current folder
- Open Folder in Browser – Display a dialog where you can navigate to and open a folder
- Thumbnail – View the images in the current folder as thumbnails
- Combination – View a preview at the top of the image area with thumbnails listed underneath
- Preview – Display the preview only
- Full Screen View images full screen
- Multi Preview – View images side by side. Choose from “Compare Images” and “Compare Before and After Images”
- Compare Images – View selected images side-by-side
- Compare Before and After Images – View an image as it appeared before adjustment side by side with the adjusted image
- Current – Apply current adjustments to the “before” image for use as a reference when making further modifications
- Original – Restore the “before” image to the state it was in before any adjustments were made
- Preview Display Mode – Access the fit, combination, zoom, and hand tools or choose a zoom ratio for the image in the preview palette
- Gray Point Sample Tool – Click a point in the preview to adjust white balance so that the sampled point takes on a neutral gray color
- Straighten Tool – Straighten images
- Crop Tool – Crop images
- Open with – Open images in other applications
- Convert Files- Save images in JPEG or TIFF format. Adjustments are applied before the image is saved
- Batch Process Status – View batch process status
- Cancel Batch Process – Cancel batch processing
- Rating/Label Filtering – Filter images by rating or label
- Filtering – Filter images by rating, label, or camera settings
- Cancel Filtering – End filtering and view all images.
The following Palettes are also included:
Folder palette
Select a folder to display its contents in the image area.
The folder palette lists the folders in the computer’s storage system. Click a folder to view the images it contains in the image area or preview display.
The folder palette menu gives access to recent folders. Frequently-used folders can be added to and then accessed from this menu.
Image area
View the images in the current folder.
Selected image
Selected images are highlighted in gray. Double click to preview.
Histogram palette
View the tone distribution for the selected image.
The histogram palette provides a constantly-updated histogram for the selected thumbnail or the image in the preview display. The histogram shows the tone distribution for the color channel selected in the channel menu. Choose RGB to view overlapping distributions for the red, green, and blue channels: tone ranges in which the distributions for red and green overlap are shown in yellow, those in which red and blue overlap in magenta, those in which green and blue overlap in cyan, and those in which all three colors overlap in white.
Edit/metadata palettes
Retouch images using the tools in the edit palette or switch to the metadata palette to view image information.
The Edit Palette
Use the tools in the edit palette to adjust the image currently selected or previewed in the image area. The tool list offers Exposure Compensation, White Balance, Picture Control, and Tone/Tone (Detail) tools that can be accessed via pull down menus or by clicking the tool icon and adjusting settings in the adjustments palette. Additional tools can be accessed using the tool buttons at the bottom of the palette. The adjustment manager tool can be used to copy adjustments to other images or save current settings for later use. To reset all tools and restore the image to the state it was in when first opened in Capture NX-D, click the restore button (note that any changes made to JPEG and TIFF images in other applications since they were last opened in Capture NX-D will not be reset).
At the bottom of the Edit Palette there are the Tool Buttons and the Restore Button as follows;
Tool Buttons
Note that some of these tools can be used only with RAW (NEF/NRW) images.
- Noise Reduction
- Lens Correction
- LCH – The LCH color space models color using values for lightness (a property similar but not identical to brightness or luminance), chroma (color saturation), and hue. These parameters can be accessed via the channel menu in the image adjustment palette when the LCH tool is selected.
- Straighten
- Unsharp Mask
- Levels & Curves.
These tools are accessed by clicking the buttons and adjusting settings in the adjustment palette. The buttons for tools that have been modified from default values are highlighted in yellow.
The Restore Button
Click the restore button to reset all tools and restore the image to the state it was in when first opened in Capture NX-D (note that any changes made to JPEG and TIFF images in other applications since they were last opened in Capture NX-D will not be reset).
The Metadata Palette
The metadata palette lists information on the image currently selected or previewed in the image area, including exposure, the model of camera used to record the picture, and the date and time of recording. The metadata palette can be displayed in the position normally occupied by the folder palette by selecting Dock to Left in the palette menu.
Status bar
At the bottom of the screen view information on the selected image.
View information on the image selected or previewed in the image area.
- File name – The file name
- Zoom ratio – The zoom ratio at which the preview is currently displayed
- Color space – The color space of the image in the preview display
- Image size – The size (in pixels) of the image in the preview display
- Color value – The color of the pixel under the cursor in the preview and combined displays
- Position in folder – The position of the current image and the total number of images in the folder.
Summary
It can be noted that most of the edit tools included in Capture NX-D are very much the same as in Capture NX2. Bear in mind the this outline only covers the Beta version of Nikon Capture NX-D and changes will occur in the finally released version.