This article is a general guide to building a remote control cable for Nikon cameras with the 10-pin socket.
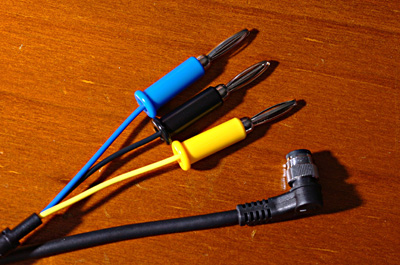
The MC-22 remote control cable available from Nikon is terminated with the Nikon 10 pin connector at one end and three banana plugs at the other end.

The ends of the cable together with the colors of the bananna plug cables is shown as illustrated above.

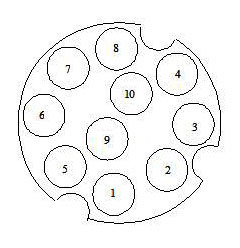
The pinout of the 10 pin connector on Nikon cameras is shown above.
Three of the pins are used for triggering the camera and the usage of all the pins is as follows:
- 1 – Data receive
- 2 – Battery voltage
- 3 – +5V regulated, meter on
- 4 – Shutter release signal Fully depressed release button
- 5 – Shutter Release Pulse to Second Camera
- 6 – Signal Ground
- 7 – Power Ground
- 8 – Data transmit
- 9 – Activate signal. Half depressed release button
- 10 – Not connected
The connections for the MC22 remote cord are as follows. Three of the pins of the 10 pin connector are used for triggering the camera and they terminate with the MC-22 cable with Blue, Yellow and Black banana plugs as follows. The actual wires are similarly colored blue, yellow and black.
- 1 – Pin 9, half depressed release button, blue
- 2 – Pin 4, fully depressed release button, yellow
- 3 – Pin 6, common signal ground, black
The correct sequence to operate the camera is to connect the Blue wire to the Black wire and this causes the camera to wake up or to activate the exposure and auto focus to be switched on. This simulates the first pressure on the shutter. Then connect the Yellow wire to the Black wire and this fires the shutter. This is exactly the work performed by your right hand finger when you depress the shutter button.
To manufacture a remote cable, cut the banana plugs off the MC-22 cable and terminate it in a switch box via an extension cable to enable remote operation of the camera.
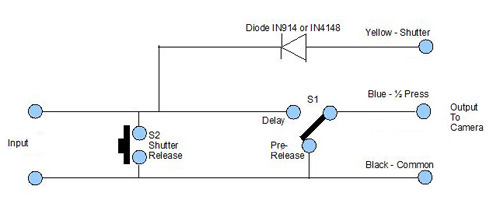
The basic circuit of the switch box to remotely control the camera is as follows.
- The three connections on the right of the above diagram go to the camera 10-pin connector with the color codes shown
- The connections on the left of the above diagram can go to another remote camera initiating device or to a Pocket Wizard device to provide a longer distance radio connection by remote control
- S1 is a toggle switch which is used to wake up the camera
- S2 is used to effectively operate the shutter and to take the image, this is a push button switch which is used to take single or continuous images as required.
On switching the switch S1 to the pre-release position, the camera exposure meter and auto focus operates waking up the camera; with S1 switched to the delay position the camera will auto focus and then operate the shutter when switch S2 is pressed. There will be some delay while the camera focusses.
The camera will be in the “awake” mode continuously while switch S1 is operated in the pre-release position, in the pre-release position the camera will remain on, which will continuously consume battery power of the camera.
When S1 is in the delay mode the camera only remains on for a short period while the shutter release button S2 is pressed, however there will be a short delay while the camera focusses.
When the camera is set to ‘Bulb’ mode, closing switch S1 will wake up the camera, pressing the push button S2 will open the shutter until released.
I have used this set up with a cable of up to 80 metres, with the D2H camera and I expect it would be applicable for all Nikon cameras using the standard Nikon remote 10 pin connector described above.
It should be noted the when the camera wakes up with a dedicated flash attached, the flash will also wake up with the camera, this applies to dedicated flash units such as the Nikon SB600, SB 800 or SB 900.
As noted above this remote circuit can be used to provide a pre-release cable for a Pocket Wizard radio device and depending on the position of switch S1 can be used as a pre-release cable or a delayed release cable.
There is also the Nikon MC-36 remote release available.
The pin layouts given here in this blog are for information purposes only and any modifications you do could affect your camera equipment so be careful.

